My first open reel tape recorder was an Otari MX-5050 that a friend gave me in the 1990s. It was a solid machine that could record and play both 2 and 4 track 1/4″ tapes. However, after I started doing live concert recordings, I needed something better since the Otari was not exactly portable and the quality of the recordings made on this machine was not great. The Nagra IV-S had been a standard for location sound recording since the early 1970s until digital came along. These machines were built like tanks and still sound marvelous today. I bought mine from a studio equipment store in the UK. It was an ex-BBC unit that came with the QGB 10.5″ reel adapter. It had served me well for more than a decade, making many recordings of mainly classical concerts. Last year, I learned that the engineer who was in charge of the analogue recorders at Nagra, M. Herbert Bartels, had just retired. I therefore called Nagra (now called Audio Technology Switzerland) to ask if I could send my IV-S in for a major service. It was about time since I had been using it for 12 years without any professional servicing. M. Bartels was very graceful in agreeing to return to work part-time for this. After I sent them the recorder, an idea came to me. The IV-S is a fantastic analogue recorder, but the playback function is a bit of an afterthought given its main function as a location recorder. As the analogue tapes I made were for archiving, with the multitrack digital files being the source for mastering, playback function was not important other than for my own amusement. Nagra of course had their famous studio machine, the T-Audio, since the early 80s for mastering function. This was a marvel of Swiss engineering, and apparently cost £23,000 when it debuted in 1983. For that amount, one could buy a luxury car in those days or even a small flat in London ! This was simply too expensive for most music studios, especially for a two-track machine, but it became the darling of movie studios with their much larger budgets. It also gained traction in the scientific community as a data recorder. So I figured I could ask if they had one available, and if the price was not crazy, I would consider buying one. It turned out that they did have one available, and M. Bartels could work it over and change all the necessary parts including the heads, rollers and belts. The price of 8500 CHF seemed very fair to me, especially since the man who wrote the original service manual would be giving it a once over.
After I received the machines back, both in brand new, original shipping cartons, I immediately made comparisons. While the IV-S playback is competitive with an excellent turntable set-up, the T-Audio is in a different class altogether. The sound is huge, with more weight, more solidity and more power. It is as if the energy of the music has been cranked up by an order of magnitude. However, while it is widely acknowledged in the pro audio community that the T-Audio is one of the best transports available, its playback electronics are not up to the same level of performance. Soon, audiophilia nervosa compelled me to find ways to improve the playback performance. The major criticism I have with the machine is that it sounds a bit electronic, and what is missing is the organic flow of the music and the natural tonality of the instruments. This would not surprise anyone who has looked at the schematic of the repro board. The circuit design is heavily reliant on op amps, mainly LF353N. Whereas one can design pretty respectable audio circuits with modern op amps nowadays, this was not the case in the early 1980s. After doing a bit of research, I found a trove of information on how to wire the repro head of tape machines to outboard electronics. Dr. Bottlehead even has a T-Audio thus modified to work with his tube repro electronics. I therefore called Tim de Paravicini, whom I have known since the 1980s. He was not keen on this idea, since he thought noise could be a problem. He suggested that I send him the repro board and he would work his magic on it. I called Nagra to see if they have spare repro boards, just in case things go wrong. The answer was no. Therefore, if something goes wrong, if the board gets lost in the post, I am toast. The transport simply won’t work without the board, even if I use outboard electronics. Unless I bring the board over to Tim and wait while he modifies it, there will always be a risk. I also don’t want to do irreversible modifications on the machine. Well, I guess I would have to do some experimentation myself.
First, I had to wire the repro head out. The original coax cables from the heads were connected to the vertically placed main circuit board and easily accessible after opening the back cover, with the various daughter boards inserted horizontally from the front. The two cables for the repro head were unsoldered, and I soldered a pair of twisted, teflon-sheathed solid silver wires onto each cable (Fig. 3). I then connected a ground cable to the chassis ground. The signal cables were terminated with Lemo plugs in a single-ended fashion.
I had an Allen Wright RTP-3C phono preamp that I painstakingly built over the course of two years sitting idle on the shelf, as I was using the RTP-3D as my preamp. Built entirely by point-to-point wiring, it was easy to modify. All I had to do was to modify the RIAA section for tape equalization instead. Since the design used passive RIAA, it made life a lot easier. As I only use Nagramaster and CCIR EQ, there was no need for NAB. I determined the input impedance of the stage following the EQ section using a trim pot, and calculated the values of the capacitors and resisters. I used latching relays to switch between the different EQs so that connections are kept as short as possible. As I did not have a test tape for Nagramaster, I recorded the test tones using my IV-S, reasoning that all the Nagramaster tapes I have were recorded using this machine anyway. I then adjusted the resistor values using trim pots until I could get a satisfactory frequency response curve for both EQs. The Nagramaster EQ gave a very extended response, with a slight +2dB bump at around 15 KHz, 0dB at 18KHz and then steeply drops off thereafter. I managed to get the bass response to -3dB at around 30Hz. For CCIR, -3dB was at around 18KHz. The sound of the playback was much improved. The hard edge was gone and the tone of instruments was much more organic.
Good things don’t last forever, and in this case, with the 15-year-old tube preamp having been sitting idle on the shelf for about 8 years, something was bound to go wrong. One of the regulator boards went up in a puff of smoke after about 6 months of use. It was a shunt regulator and ran hot normally, as I liked to keep a fairly high shunt current for better dynamics. One of the resistors has turned into charcoal, damaging the board at the same time. I tried repairing it to no avail. As my dear friend Allen had passed away some years before, I did not know whether I could get a replacement board. Fortunately, Mrs. Wright has continued to run the business and I managed to get another blank circuit board from her. After installing all the components, and setting the correct voltage and shunt current, everything checked out. I had just received the latest installment of the Analogue Production tapes and I was eagerly looking forward to hearing them. I sat down to listen, and halfway through the first tape, the new board went up in a puff of smoke again ! A new board with new components lasting only 15 minutes ? It must be the amplifier circuit that had a fault and somehow shorting out the regulator. The fault was probably intermittent, and therefore everything checked out when I first installed the new regulator. As all the tubes were new (less than 6 months) and soak tested beforehand, it was likely due to some other components and I probably have to rebuild the whole channel.
However much I like my soldering iron, I was getting fed up. Truth be told, I still get pretty nervous when testing live equipment with 400V DC rails after all these years; another good reason to go solid state. In fact, I had been reading a lot of good things about Charles King’s King-Cello tape preamp. This preamp is based on the legendary Cello Audio Suite tape preamp circuit, updated with modern components. It is built to order with a lot of customization possible. I wrote to Charles and told him what I needed. He had quite a few orders to fulfill, as these preamps are hand-made one by one, but he got to mine in November. We decided to have precision pots installed for EQ adjustment, so that I can dial in the precise corner frequencies. The only caveat is that the preamp is single-ended. My whole system is balanced differential, and I was a bit worried about noise with a single-ended connection. Given the arrangement of my set-up, my main preamp is about six feet away from the tape preamp, as I have to accommodate my turntable as well. I generally prefer unshielded cables to reduce capacitance, and the better than 60dB of noise rejection in a balanced connection is highly welcomed in a system as sensitive as mine.
Even before the preamp arrived, I wanted to prepare for the worst. I rummaged through my parts boxes and found a pair of line input transformers salvaged from a Neve mixing desk. These are quite excellent transformers, and since most music recordings during the golden age were mixed using these desks, they can’t be too bad. I therefore hooked them up using a plastic food storage box as chassis to give me a balanced output to drive long cables. When the tape preamp arrived, I quickly connected it up to the system and my worst fear was confirmed. There was a hum. I connected the output through the balancing transformers but the hum remained, so the ground loop was not between the tape preamp and the main preamp. I disconnected the earth at the power plugs of the tape machine and the tape preamp alternately to no avail. I asked Charles for advice and he recommended that I connect the headblock ground directly to the preamp chassis. I located the ground wire coming out of the headblock, followed it to its connection at the chassis ground, lifted this and extended it with an extra length of wire (Fig. 2) to connect to the tape preamp chassis ground. This significantly reduced the noise. I then star grounded the chassis grounds of the tape preamp, the tape machine and the main preamp to a CAD (Computer Audio Design) Ground Control device, and disconnected the earth connection of the tape machine and the tape preamp at the mains plug, so that everything is grounded through the main preamp only. Now, there is total silence even through the single-ended output connection.
The sound of this set up is definitely an improvement over the Nagra’s repro electronics. The scale and dynamics are preserved, but the electronic character is gone. Compared to the RTP-3C, the instruments seem to be more focused and there is more treble energy. The tube preamp did sound more “organic”, for lack of a better word. Listening to the Analogue Productions Power of the Orchestra Ultratape, the dynamics appear to be limitless. The build up of tension during long crescendos can be both exhilarating and foreboding, as one never knows whether the rest of the system could handle it, and the climaxes could make one’s hair stand on end. Aside from the other Ultratape releases, the only recording I have heard that is comparable would be Analogue Production’s own DSD release of the Dorati Firebird. I only hope Chad will make the Mercury Living Presence recordings available on tape format. Listening to my own session masters, my team’s original intention during the making of the recordings came through clearly. The King-Cello preamp adds or subtracts very little from the signal, resulting in a very neutral representation of what is on tape, which is what one wants for mastering purposes. I am therefore not surprised why so many professional mastering engineers are outfitting their decks with Charles’ electronics. With the quality of the sound and the ability to customize, it must be one of the great bargains in audio today.
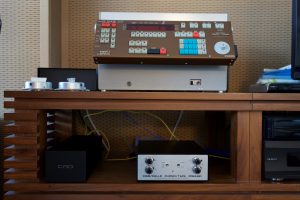
Fig 1. The Nagra T Audio with the King/Cello tape preamp and the CAD Ground Control device. The four dials allow users to set the LF and HF equalization accurately.
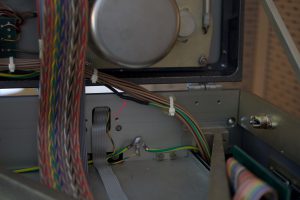
Fig 2. Cable bundle from the headblock, showing the ground cable (red arrow) with the extension cable spliced in.
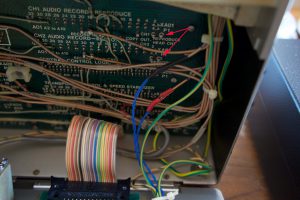
Fig 3. The red arrows indicate the connection points of the repro head cables to the main circuit board. The cables have been disconnected from the board and a pair of teflon-sheathed silver wires spliced in to connect to the tape preamp inputs.
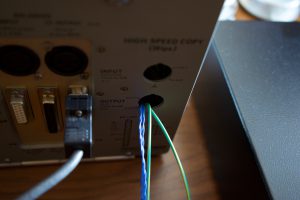
Fig 4. The two signal cables, the headblock ground cable and the chassis ground cable are brought